
KEY FACTS
➤ Touch7 specialises in creating design tools for Adobe CC, for designing in, and separating artworks for printing.
➤ Touch7 DOES NOT separate Pantone® colours from the Pantone® Extended Gamut Guide.
➤Touch7 is NOT a profiling or colour management solution provider – There are already excellent systems out there to do press characterisation.
➤ It is assumed that a printer would already have their press fingerprinted to create a multichannel profile. If the customer does not use spot colour printing to date, they must have their press characterised using existing technologies, which would take in to account the spot inks being utilised on the press.
TROUBLESHOOTING
-
"Extensions" menu is greyed out in Adobe Photoshop
- If the Extensions menu is greyed out, you need to switch on the extensions panel option:
PREFERENCES > PLUGINS
Ensure the checkbox is switched on for "Load Extensions Panels"
Quit and restart Photoshop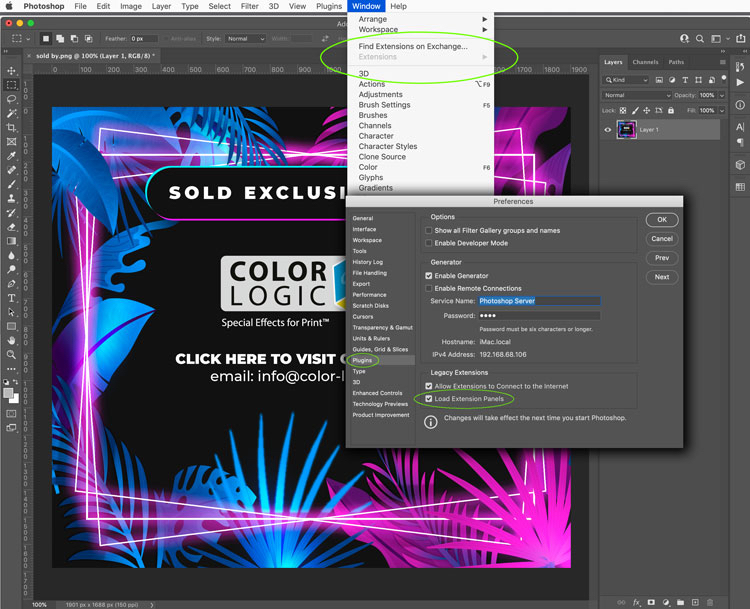
-
"Extensions" menu not visible in Adobe Photoshop – This is related to the latest Macs running the M1/2 chips
- *** We are currently redeveloping all our plugins for the new Apple UXP ***
Customers running the latest Apple Macs with the M1/2 chip will need to open Photoshop in Rosetta Mode in order to continue to use the Touch7 Photo plugins – this is because Adobe Photoshop on the M chip computers no longer supports HTML5 plugins/extensions and there is no "extensions" menu. However, simply opening Photoshop in Rosetta mode will open Photoshop in the original apple code and allow you to continue to use third party plugins, whilst developers learn the new apple code and redevelop their products. There has been no noticeable speed differences between the silicon version of Photoshop or switching to Photoshop in Rosetta mode, with no loss of function.
To open Photoshop in Rosetta mode:
1. "get info" on the Adobe Photoshop application and switch on "Open using Rosetta" this will then allow the application program to open up using the original apple code and will therefor allow you to continue to use plugins and extensions.
2. Open Photoshop, that's it!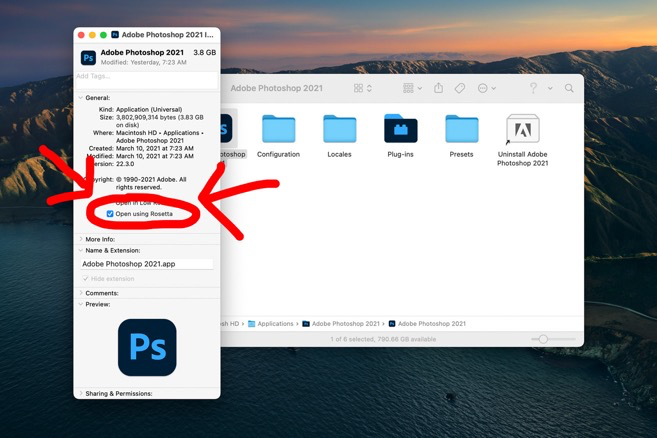
-
The Touch7 plugin is not showing after installing using Anastasiy’s Extension Manager
- If after installing Touch7 using Anastasiy’s Extension Manager, you find that it is not visible in Photoshop, this is a known issue related to an error/incompatibility with Anastasiy’s Extension Manager and the computer operating system and is not actually an issue with the Touch7 zxp file. Please do the following:
1. uninstall the plugin from Anastasiy's Extension Manger
2. Try installing using www.zxpinstaller.com -
Error message “The extension is damaged or file is not accessible, please re-download it (error code: 152)”
- Some users are reporting the above error message when using Anastasiy’s Extension Manager. This appears to be related to an error/incompatibility with Anastasiy’s Extension Manager and the computer operating system and is not actually an issue with the Touch7 zxp file. Please try using www.zxpinstaller.com as an alternative method of installing.
-
I keep getting a “Max Activation” message when trying to load Touch7
- Touch7 is licensed as a single seat application. If you attempt to install the Touch7 plug-in on another computer, using the same license code and/or email address, you will get the message that you have reached the maximum activations. Please note that license codes can have multiple installs, if your license purchased is a multi-user license code.
-
How can I uninstall Touch7 from Photoshop?
- Depending on the version of Touch7 that has been installed, will depend on how the extension needs to be uninstalled – Please contact us for assistance
-
Why have the Touch7 Photo buttons stopped working, when I have a valid license?
- If you have a valid Touch7 license and you notice that the buttons on the plugin suddenly stop working, it’s highly probable that you have tried to go back in your Photoshop History to the original image, in order to try out some other Touch7 buttons! However, when Touch7 does it’s calculations, it creates “Snapshots” based on it’s working process – If you try to go back in your History, those “Snapshots” will still be present and as such, it will lock out the other ECG buttons. To resolve this, simply delete the existing “Snapshots” from your history.
SYSTEM REQUIREMENTS
-
Minium system requirements
-
Touch7 requires Adobe CC or higher.
Touch7 is a cloud based subscription service, and as such requires the user to have an Adobe Creative Cloud account. If you do not have a creative cloud license, Touch7 will not work.
Touch7 works with both Mac and PC -
Will Touch7 work with Adobe CS6 or earlier?
-
NO. Touch7 requires an Adobe Creative Cloud account. It will not work in earlier versions.
PROFILE & SEPARATION FAQS
-
Why do I need Touch7 when I could just use the magenta and/or yellow channels and print those with the Neon inks?
- A question was posed to our technical team "Why do I need Touch7 Photo NEON, when I could just duplicate the magenta and/or yellow channels from an image, and print those with the Neon Pink or Neon yellow?"
Great question – Let us explain both visually and technically how Touch7 works.
First, you need to consider where "yellow" and "magenta" are used within a typical image – Yellow is a colorant that is found in greens, green/blue hues, reds/oranges, grey tonal areas, shadows etc, in fact, this is true of most colours used in printing, as each primary is used to create everything from skin tones to grey balance – so, if you use an approach of just duplicating the yellow or magenta channel, then those neon toners may contaminate other colour groups within an image.
In the visual below, we have shown the magenta and yellow channels within an image – as you can see, yellow and magenta are in almost every region of the image – whereas the Touch7 Neon plugin isolates and extracts out only the pink or yellow pixels within that image – this is done using a process of subtracting each pixels hue value from the image, to leave only the yellow and pink pixels – the reason we recommend to adjust the touch7 separations after they are created, is because colours like "pink" are a shade of Magenta, so it can only extract out the hue value for pink, which is not solid! And, when you have a colour that is not perfectly pink, for example, it might have a slight blue tint to it, or even a colour that moves towards the purple end of the pink colour spectrum, then you have to remove the blue pixels from that colour to leave only the "true" pink pixels within the image – The Touch7 plugins use a mathematic algorithm to extract out that data, and then you have the freedom to boost up those colours to make them more solid, if you wish to!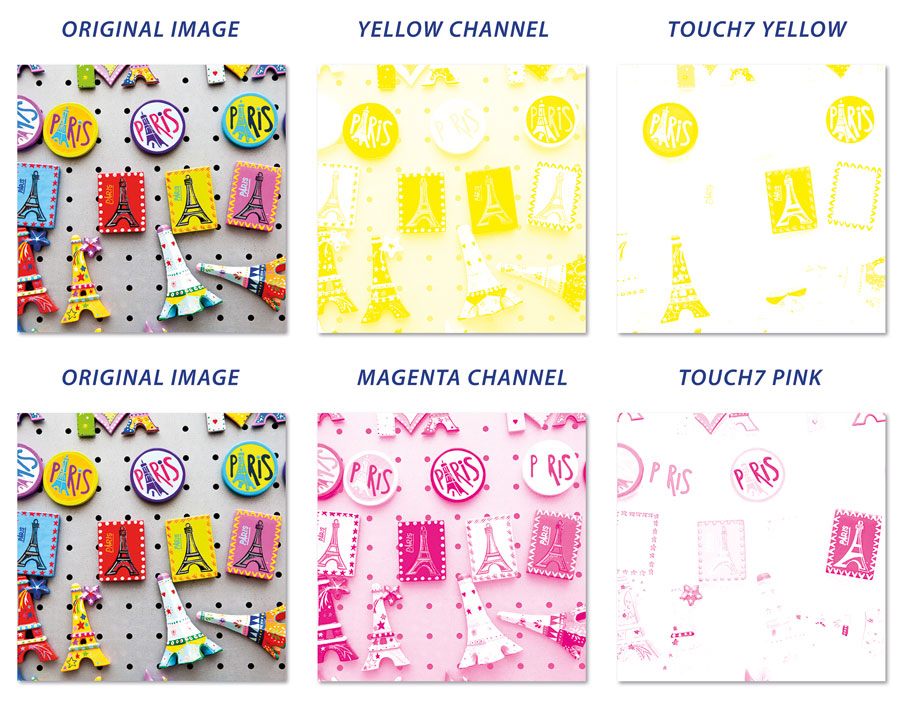
Also, Touch7 has SCR buttons – Source Colour Removal – The SCR buttons subtract the neon separations from your original image (a bit like UCR, but for neons!) – if you print the pink or yellow neon inks/toners on top of an image, that's overprinting and you increase the saturation, but then you might start to go above the total ink limit for the press – if you print pink over red colours, you can also contaminate that colour – so, as an example, if you have a customers image, of a lady in a red dress holding some pink flowers, Touch7 will only affect the pink flowers, whereas using the magenta channel would also put pink into the red dress, which would change the colour of that dress!
Below an example of the SCR button in use. As you can see, the pink colours have been removed from the original RGB, so that you only print with Neon pink in those areas, instead of adding neon pink on top of the magenta as an overprint!!!
Grey balance is also critical for printing – using either the yellow or magenta channels based on duplicating either the magenta or yellow, could contaminate the background in the image below, and make this image look pretty terrible. The only way to get around that is to manually go in and mask out all the unwanted areas of the image, which is both time consuming and not entirely accurate, whereas Touch7 does everything with a single click of the button, in seconds.
The image below shows what happens to the grey balance (and all other colours) if you just duplicating the Yellow or Magenta channels, compared to Touch7 – As you can see, Touch7 does not contaminate any other colour groups, whereas duplicating the channels has drastically changed the image entirely – meaning that you then would need to go in and do image masking!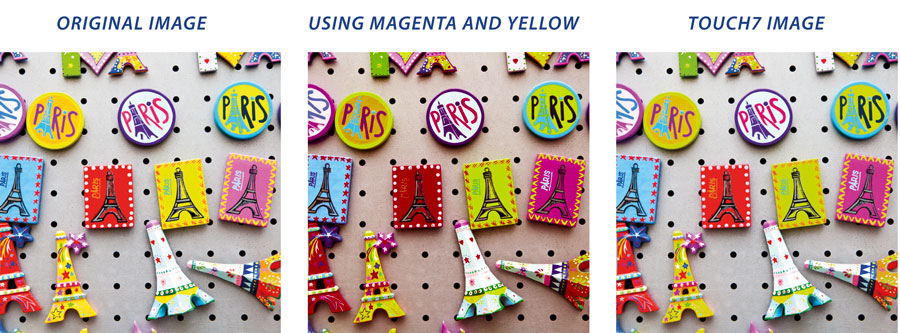
As a final example, in this image below we are using the magenta channel to compare against the Touch7 pink separation – As you can see, magenta is in every colour group in this image, it is even in the greens in the ladies transparent plastic hat – using the magenta channel for adding pink to this image as duplicate channel would also contaminate the skin tones! As such, you would have to mask the image out – Also, if you look at the shadows under the collar of the shirt in the bottom left – in the magenta channel, that is solid magenta, whereas in the Touch7 image, that is calculated based on subtracting all other pixels from the image, so that the image prints photorealistic and natural, with zero masking required! Not only does this create a more aesthetically pleasing and photorealistic image, but it also ensures that you are not wasting neon inks/toners where they are not needed within the image – and seeing as you have to pay for the 5th ink/toner on the press, that is a cost saving to the user! I guess you could say that Touch7 in this instance, acts as an ink reduction tool!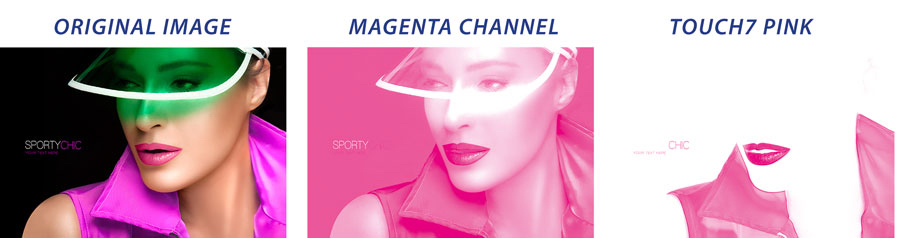
-
Do I need to use special ICC profiles to convert my images using Touch7?
- NO. Touch7 does not create ECG separations through ICC profiles. Instead, Touch7 intelligently calculates the ECG ink separations from the source pixels. We provide a dedicated swatch palette for our main partners, where you can use their LAB values when setting up your art files.
-
Why do I need Touch7 Photo? Can’t I just use a n-color ICC profile in the RIP?
- A question was posed to our technical team "Why do I need Touch7? Can’t I just use a n-color ICC profile in the RIP (as an output profile) and keep my images in the original wide gamut RGB (with profile) all the way to the RIPing process?"
Doing Extended Colour Gamut working in the RIP, you have no creative control over the image.
Question to consider – If you have a ripped job, let's say it's a page out of a clothing catalogue – can a profile choose to only apply ECG to one image on that layout, ignoring all the other images? Or does a profile apply it's effects to ripped data (1bit tiffs) used to print/proof?
A profile does not allow you the creative freedom to isolate individual colour groups and/or selective areas. It's all or nothing with a profile. How would a profile apply enhancements to just one area of one particular image? For example. You have a CMYK image of a lady in a red dress, holding a bunch of purple flowers, standing on pale green grass, against a dark blue sky...All of which could be enhanced for ECG...But I only want to boost the ladies red dress, and I don't want it to effect my skin tones. How would a profile handle that?
Also, having an RGB workflow is great...If you have an RGB image! And even if you do have an RGB image, who's to say it's not already been converted to CMYK at some stage, clipping the colour data, and then saved back to RGB? Or that it’s actually a good quality image with good tonal range and saturation? What’s more, given that the printing industry has just spent the last 20+ years telling designers NOT to work in RGB as it would not match the CMYK proofs they would get in return...We have a long way to go to get them all using RGB again!
Touch7 gives creative freedom to the designers who do the work. Think about this – if you design a file in CMYK and run a proof out and send it to your client to approve (the client signs off your proof for colour and content) – you then send that file to a printer, who in turn converts it to an extended gamut – The printer charges you/the designer for the proofing (more cost) and it goes back to the client to sign off…but it will no longer match the original proof the designer sent the client to approve in the first place! Designers might also wish to make changes to the artwork, or asks the printer for colour correction to the ECG enhanced areas.... Back and forth with proofing, whilst costs stack up! So, why do the work at the end of the work flow? Why not do it upfront, where the creativeness happens and save both TIME and MONEY?
Everyone is thinking about profiles, nobody is thinking about the designer or creativity! And those that do think of profiles, are typically the high end printer that can afford complex and expensive separation systems.
And what about getting creative with ECG – you only need to look at the background of the “Camera Shy” Calendar below. Notice the pattern in the background that has been knocked out of the ECG gradient? – how would a profile do that? You can't! You can only do creative things, at the creative stage!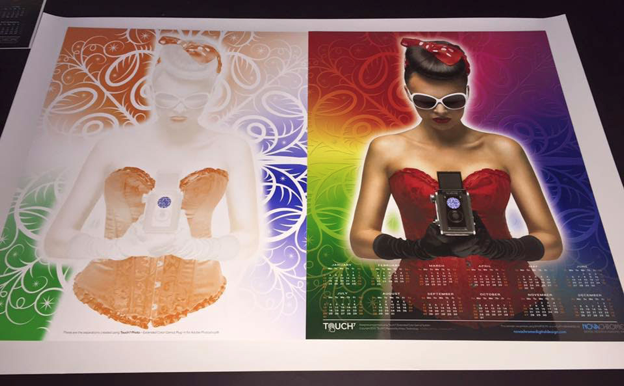
GENERAL FAQS
-
Do I have to use RGB images or can Touch7 work with CMYK?
-
NO. Touch7 will work with any coloured image, however the best conversions are achieved from an original image captured in RGB. Images that have been converted to CMYK have already had some of their colour data clipped
-
Why do my images not look any different when printing directly from Adobe Photoshop?
-
If you are trying to print a Touch7 image in RGB plus spot colors directly to your device from within Photoshop, it will not be possible as they are two entirely different color spaces, RGB being additive and spot colors being subtractive. Photoshop cannot directly process/render the two opposing color spaces within one image. You will need to import your image in to a page layout program such as Adobe Illustrator or InDesign, and output from there.
-
Does Touch7 Photo work with PDF files?
-
YES. You can use the Touch7 Photo plug-in to convert images that are embedded within a PDF file. If you hold a valid Touch7 license you can review a support video inside the Members Area
DIGITAL, INKJET & TONER FAQS
-
Can Touch7 be used with Digital, Inkjet or Toner printing devices?
-
DIGITAL & INKJET PRESSES
Many digital devices can now print with ECG and/or Neon Fluorescent inks. For example, HP Indigo uses Orange, Green and Violet inks and also has a fluorescent pink, orange and yellow, along with vivid pink and green, to print in an extended colour gamut. Touch7 can be used to generate image separations for most digital printing devices capable of printing in an ECG gamut.
TONER & INKJET DEVICES
Touch7 Neon will work with toner systems that have Neon/Fluorescent inks or toners. For example, Ricoh Pro C7XXX series press uses Neon Yellow and Neon Pink toners. Xerox has the Iridesse with fluorescent pink and they also have the Versant which has fluorescent cyan magenta and yellow! Fujifilm Revoria has a fluorescent pink and now there are large format inkjet devices with neon inks, such as on the swissQprint.
PRINTING & INK FAQS
-
HP Indigo – Using Double Hit versus Double Repetition on
-
Double Hit versus 2 repetitions
If you apply a Double Hit to a separation/ink, only the areas with 90% tonal range or higher will be affected (this is often used on the silver inks to achieve the correct ink density required for metallics, without affecting halftone). If you repeat a separation twice, or even three times, all the separation tonal values will be repeated throughout the curve.
The process to apply a Multiple Hits, or Multiple Repetitions, can be specified in the Job Ticket on the DFE or directly on the press.
Personally, we would recommend using multiple repetition, because ECG/NEON separations will have tonal value throughout the image, including half tone and quarter tone regions – so if you were only to use "double hit" and not double repetition, then you would only be affecting the 90% upwards region of your images, and your designs would lack impact and vibrancy.
HP Indigo recommends using 2 hits/repetitions of their ECG and Fluorescent inks (does not apply to vivid inks) on gloss coated papers, and 3 hits on matt and uncoated substrates. -
What are the recommended "Extended Colour Gamut" inks for analogue printing?
-
ECG inks vary across printing devices, with some machine manufacturers developing their own proprietary ECG ink sets. As such, you should use the ink for your particular device. However, as a guideline, the following inks can be used for analogue devices.Recommended Pantone® Inks
PANTONE® is the property of Pantone LLC. All other trademarks or registered trademarks are the property of their respective owners. © Pantone LLC, 2017. All rights reserved.T7-Orange
Pantone® 151T7-Green
Pantone® 7481T7-Blue
Pantone® 2728T7-Red
Pantone® Bright RedT7-Violet
Pantone® Violet -
What are the recommended "Neon Fluorescent" inks for analogue printing?
-
Neon inks vary across printing devices, with machine manufacturers developing their own proprietary Neon ink sets. As such, you should use the ink for your particular device. However, as a guideline, the following inks can be used for analogue devices.Recommended Pantone® Inks
PANTONE® is the property of Pantone LLC. All other trademarks or registered trademarks are the property of their respective owners. © Pantone LLC, 2017. All rights reserved.T7-NeonPink
Pantone® 806T7-NeonYellow
Pantone® 803T7-NeonCyan
Pantone® 801 -
Printing with AM screen angles
-
We typically recommend FM screening to ensure absolutely no screen clash, but, if you only have AM screening the basic rule is to use the screen angle of the least prominent screened process colour that will be underneath the screened spot colour. As a general rule, we would recommend the following:
Red/Orange or NeonPink touch plates. Output separation on same angle as Cyan
Green or NeonYellow touch plates. Output separation on same angle as Magenta
Blue/Violet or NeonCyan touch plates. Output separation on same angle as Yellow